Thursday, 31 May 2012
How far will your jet propelled cable car travel?
This week we have been making jet propelled cable cars. We first made a rectangular prism and a triangular prism. We glued the prisms together to make a cable car. From there we had to thread a fishing line through a straw, stick the cable car onto the straw and blow up a balloon really big. We attached the blown up balloon to the cable car and let it take off. Tyler did really well with his cable car with a distance of 8 metres. Piripi's, Kifi's, Pace's and Miss Chapman's cable cars travelled the same distance which was 7 metres. Fine's cable car travelled the shortest distance which was 3 metres. It was a fun activity letting the balloon off and measuring whose cable car travelled the furthest.
My Presentation On How To Make A Jet Propelled cable Car By Asmah
This is my presentation about how to make a Jet Propelled Cable car please leave a comment.
Thank You!!!
Tuesday, 22 May 2012
Reflecting on my instructions by Asmah
My Reflection on my Origami Instructions
1. Are you pleased with your written instructions?
I am very pleased with my instructions because I used a lot of action verbs.
2. What part of your instructions did you find easy?
Writing the first 6 steps.
3. What part of your instructions did you find tricky?
Writing step 27.
4. What would you do differently next time?
To explain the steps in more detail.
5. Who / what has helped you write up your instructions?
My friends Latisha, Nicky and Isabella. Also my teacher Miss Paton.
Sunday, 20 May 2012
Thursday, 10 May 2012
My Paper Plane Graph By Asmah.
Tuesday, 8 May 2012
My Mothers Day Wordle By Asmah
This is my beautiful Mothers Day wordle. Without my mum I would not here. I want everyone to be thankful to their mothers.
HAPPY WONDERFUL
MOTHERS DAY!!!
HAPPY WONDERFUL
MOTHERS DAY!!!
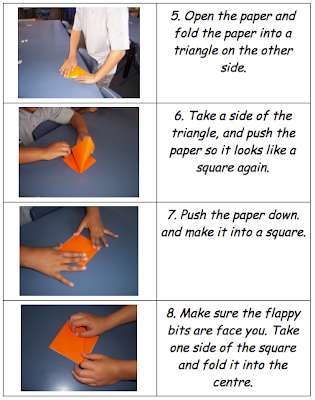
Reflecting on my Origami Crane by Asmah

Reflecting on my Origami Crane
Please write detailed answers, as reflecting helps you build understanding with your learning.
1. Are you pleased with your origami crane? why?
I am very pleased with my origami crane because I have put a lot of effort into it.
2. What part did you find easy? why / why not?
I found out that the doing the first 4 steps easy, because my year 1 teacher taught me my halves and quarters.
3. What part did you find tricky / difficult? Why / why not?
Folding the triangle into a square.
4. Who / What helped you in making your Origami Crane?
Jacob has helped me and also my teacher Miss Paton.
5. What would you do differently next time? Think about folding, listening, persistence (not giving up) etc.
To use a bigger piece of paper next time, and to try doing some of the steps by myself.
Thursday, 3 May 2012
The Mintie Challenge: How long is your Mintie Wrapper?
San Tat`s Mintie Wrapper was the longest, his wrapper was 97cm. I think San Tat`s Mintie Wrapper was the longest because he was very patient and very careful of how he ripped his wrapper. Raymond`s Mintie Wrapper was the shortest it was 5cm. I think Raymond`s wrapper was the shortest because he may had less experience on how to rip a Mintie Wrapper. My Mintie Wrapper and Pace`s Mintie Wrapper were the same, we had 92cm.
Wednesday, 2 May 2012
How to make scrumptious chocolate Easter Eggs.
Title:
How to make scrumptious chocolate Easter Eggs.
Ingredients list:
1 packet of chocolate melts.
Equipments list:
1 Kettle
1 Saucepan
*Water
Plate
Table spoons and bread and butter knives
Molds
Tin foil
Fridge.
Method :
1. Fill the kettle with water and let it boil.
2. Pour the hot water into a saucepan ask an adult to help you pour the hot water.
3. Cover the top of the saucepan with a plate.
4. Add the chocolate melts.
5. Stir the chocolate melts until they`re runny.
6. Take spoonfuls of chocolate and fill into the molds.
7. Tap the molds until they're flat.
8. Place the molds into the fridge for about 4-5 hours.
9. Take the molds out of the fridge. Wrap the chocolates into tin foil and enjoy your Easter eggs.
Subscribe to:
Comments (Atom)


